This is the multi-page printable view of this section. Click here to print.
Documentation
- 1: Overview
- 1.1: SCOP Framework
- 1.2: Basic Concepts
- 2: Getting Started
- 2.1: SCOP Framework
- 2.2: Running on Docker
- 2.3: Running on HPC
- 3: Model Library
- 4: Environment
- 4.1: Grid Environment
- 4.2: Geographical Environment
- 5: Communication
- 5.1: Identifiers
- 5.2: Messaging
- 6: Reference
- 6.1: Testing Reference
- 6.2: Logging Reference
- 7: Frequently Asked Questions
1 - Overview
This documentation provides an extensive overview of the SCOP Framework and its associated documentation, helping those new to the platform to understand where to begin, and experienced users to quickly find information regarding a specific feature.
What is SCOP Framework?
SCOP is an framework for constructing agent-based models, simulations, and complete agent-based applications. The goal of SCOP is to blend cutting-edge software engineering techniques with agent-based modeling in order to quickly develop prototypes of research and industrial cases, and assess their practicality in a real-world setting.
What is it good for?
SCOP Framework …
- is especially advantageous for creating models of open, distributed and intelligent systems that evolve over time.
- allows developers to create models in their own environment, while also giving them the ability to evaluate their algorithms more accurately and optimize performance. By mimicking the system’s dynamics at an individual agent level, the consequences of algorithms’ decisions in different situations can be studied and investigated thoroughly.
- provides comprehensive documentation and tutorials. It also contains a selection of ready to run and reuse simulations that can be utilized and modified. Currently, these simulations cover topics such as Blockchain Systems, Cellular Automata, Federated Learning, and Internet of Things (IoT).
- is compatible with all major operating systems like MacOS, Windows, and Linux, as it is designed to run on a Java (17 or later) virtual machine. It can be used as a desktop application or through a command line interface.
What is it not good for?
SCOP Framework …
- is not a Machine Learning (ML) platform. However, it is possible to integrate seamlessly libraries like Deep Java Library (DJL) to design models where agents use ML. See, for example, the Federated Learning example in the MAGE model library.
What is it not yet good for?
SCOP Framework …
- does not provide yet the full mechanism for running Reinforcement Learning (RL) experiments.
Where should you go next?
As a next step, you can see:
- Getting Started: Get started with SCOP Framework
- Examples: Check out some example code!
1.1 - SCOP Framework
SCOP Framework allows for building, experimenting and deploying multi-agent systems in Java!
With MAGE, just a few lines of code is all you need to start building agents like an expert.
What is SCOP Framework?
MAGE (Multi-AGent Experimentation) is an platform for constructing agent-based models, simulations, and complete agent-based applications. The goal of MAGE is to blend cutting-edge software engineering techniques with agent-based modeling in order to quickly develop prototypes of research and industrial cases, and assess their practicality in a real-world setting.
What is it good for?
SCOP Framework …
- is especially advantageous for creating models of open, distributed and intelligent systems that evolve over time.
- allows developers to create models in their own environment, while also giving them the ability to evaluate their algorithms more accurately and optimize performance. By mimicking the system’s dynamics at an individual agent level, the consequences of algorithms’ decisions in different situations can be studied and investigated thoroughly.
- provides comprehensive documentation and tutorials. It also contains a selection of ready to run and reuse simulations that can be utilized and modified. Currently, these simulations cover topics such as Blockchain Systems, Cellular Automata, Federated Learning, and Internet of Things (IoT).
- is compatible with all major operating systems like MacOS, Windows, and Linux, as it is designed to run on a Java (17 or later) virtual machine. It can be used as a desktop application or through a command line interface.
What is it not good for?
SCOP Framework …
- is not a Machine Learning (ML) platform. However, it is possible to integrate seamlessly libraries like Deep Java Library (DJL) to design models where agents use ML. See, for example, the Federated Learning example in the MAGE model library.
What is it not yet good for?
SCOP Framework …
- does not provide yet the full mechanism for running Reinforcement Learning (RL) experiments.
Where should you go next?
As a next step, you can see:
- Getting Started: Get started with SCOP Framework
- Examples: Check out some example code!
1.2 - Basic Concepts
Overview
Among several agent-oriented approaches [54–59] proposed in the literature, the SCOP Framework uses a modified version of organizational the Agent/Group/Role (AGR) approach proposed in [55]. We call this approach Agent/Role/Environment approach.
Agents
Agents are active, communicating entities playing roles within environments. Agents play at least one role in a environment, but may hold multiple roles and be a member of multiple environments as well. However, no constraints are placed upon the architectures, the cognitive abilities and/or the mental issues of agents.
Environments
Environments identify contexts for patterns of activities (i.e., roles) that can be shared by sets of agents (i.e., they group together agents working together). Agents may communicate, if and only if, they belong to the same environment. Environments are organizational structures [60] where the interactions make an aggregate of agents a functionally coherent whole. Moreover, environments may establish boundaries as well. Agents that do not belong to an environments may not know its structure.
Roles
Roles are abstract representations of functional positions of agents in a group. A role describes the responsibilities associated to it, the constraints that agents need to satisfy in order to obtain that role, and the benefits that agents would obtain by playing that role.
References
2 - Getting Started
Information in this section helps you try SCOP Framework yourselves.
Prerequisites
Before starting, make sure that all of the necessary requirements listed below have been installed on the system.
- Whatever operating system you are using, start by updating the package index.
> sudo apt update
> choco update
> brew update
- Install the open source distributed version control system
git.
> sudo apt install git
> choco install git
> brew install git
- Install the dependency manager
maven.
> sudo apt install maven
> choco install maven
> brew install maven
- Install the free software package for retrieving files
wget.
> sudo apt install wget
> choco install wget
> brew install wget
- Install the JDK of
Java 21or later.
> sudo apt install openjdk-21-jdk
> choco install java
> brew install java
- Install your favorite
IDE for Java(e.g., Eclipse IDE, IntelliJ IDEA).
In this documentation, we use Eclipse IDE for the examples.
- Install the open source MQTT broker
Mosquitto.
If you want you can install another broker, however you need to give correctly to MAGE its URL.
> sudo apt install mosquitto
> choco install mosquitto
> brew install mosquitto
- Moreover, it is highly recommended to have an account from an open source end-to-end software development platform with built-in version control like GitLab, Github and so on.
In this documentation, we use GitLab since it has built-in version control, issue tracking, code review, CI/CD, and more.
Installation & Setup
In this section, we describe how to create and set up your first MAGE project.
This section is prepared for Windows. If you using Windows, make sure that The Windows Subsystem for Linux (WSL) is activated. For Linux/MacOS, the instructions are very similar.
Create a project on GitLab
Using your browser, sign in to your GitLab account and click create a new blank project.
Give a name to your project such as ABMProject and set the project slug as mage.abmproject.
Note that, the project slug must not contain the character
-as it will be used during project configuration.
Clone the project using git
On the project home page, click Clone and then click Clone with HTTP to copy the project git url to the clipboard.

Open a terminal window and go to the git folder.
> cd git
Type git clone and paste the url from the clipboard.
> git clone https://gitlab.com/ogurcan/mage.abmproject.git
This will fetch the empty project from GitLab. You will to see the following output:
Cloning into 'mage.abmproject'...
remote: Enumerating objects: 3, done.
remote: Counting objects: 100% (3/3), done.
remote: Compressing objects: 100% (2/2), done.
remote: Total 3 (delta 0), reused 0 (delta 0), pack-reused 0
Receiving objects: 100% (3/3), done.
Build your MAGE project
Enter inside the project’s folder.
> cd mage.abmproject
Fetch the project builder script using wget.
> wget https://gitlab.com/scop-framework/mage.template/-/raw/master/.mage-project-builder.sh
This will download .mage-project-builder.sh to the project’s root folder. You will to see the following output:
--2022-12-02 15:45:51--  https://gitlab.com/scop-framework/mage.template/-/raw/master/mage-project-builder.sh
Resolving gitlab.com (gitlab.com)... 172.65.251.78
Connecting to gitlab.com (gitlab.com)|172.65.251.78|:443... connected.
HTTP request sent, awaiting response... 200 OK
Length: 1866 (1.8K) [text/plain]
Saving to: 'mage-project-builder.sh'

mage-project-builder.sh       100%[=================================================>]   1.82K  --.-KB/s    in 0.004s

2022-12-02 15:45:51 (439 KB/s) - 'mage-project-builder.sh' saved [1866/1866]
Execute the script to configure your MAGE project:
> chmod +x .mage-project-builder.sh && ./.mage-project-builder.sh
> .mage-project-builder.sh
>.mage-project-builder.sh
This will download all necessary files, install the required mage.api dependency using Maven and configure the pom.xml file.
Note that it will take the parent folder’s name as
artifactIDinpom.xml.
Verify the project structure
To verify the configuration, first list the project folder contents using the dir command.
> dir
13/12/2022  23:39    <DIR>          .
13/12/2022  23:39    <DIR>          ..
13/12/2022  23:39             1,478 .classpath
13/12/2022  23:39               178 .gitignore
13/12/2022  23:39               497 .gitlab-ci.yml
13/12/2022  23:39    <DIR>          .m2
13/12/2022  23:39               155 .mage-api-install.sh
13/12/2022  23:39               111 .mage-execute.sh
13/12/2022  23:38             2,072 .mage-project-builder.sh
13/12/2022  23:39               541 .project
13/12/2022  23:39    <DIR>          .settings
13/12/2022  23:39             4,909 pom.xml
13/12/2022  23:39             1,296 README.md
13/12/2022  23:39    <DIR>          src
               9 File(s)         11,237 bytes
               5 Dir(s)  329,697,140,736 bytes free
To have a detailed view, now list the tree structure of the project folder using the tree command.
> tree /a /f
Folder PATH listing
Volume serial number is B8B2-6F1E
C:.
|   .classpath
|   .gitignore
|   .gitlab-ci.yml
|   .mage-api-install.sh
|   .mage-execute.sh
|   .mage-project-builder.sh
|   .project
|   pom.xml
|   README.md
|
+---.m2
|       ci_settings.xml
|
+---.settings
|       org.eclipse.jdt.core.prefs
|       org.eclipse.m2e.core.prefs
|
\---src
    +---main
    |   +---java
    |   |   \---mage
    |   |       \---abmproject
    |   |               HelloWorldExperimenter.java
    |   |
    |   \---resources
    |       |   log4j.properties
    |       |   mage.api-1.0.0-a.1.jar
    |       |
    |       \---experiments
    |               DefaultExperimenter.xml
    |
    \---test
        +---java
        \---resources
                log4j.properties
We are done with the script. Delete it.
> rm .mage-project-builder.sh
> del .mage-project-builder.sh
> rm .mage-project-builder.sh
Try executing it out!
To try the default example experimenter, run the .mage-execute.sh script in the project’s root folder.
> ./.mage-execute.sh
> .mage-execute.sh
>.mage-execute.sh
This will execute the HelloWorldExperimenter and will generate the following output.
[INFO] Scanning for projects...
[INFO]
[INFO] -------------------< scop-framework:mage.abmproject >--------------------
[INFO] Building scop-framework.mage.abmproject 0.0.1-SNAPSHOT
[INFO] --------------------------------[ jar ]---------------------------------
[WARNING] The artifact org.slf4j:slf4j-log4j12:jar:2.0.3 has been relocated to org.slf4j:slf4j-reload4j:jar:2.0.3
[INFO]
[INFO] --- maven-resources-plugin:2.6:resources (default-resources) @ mage.abmproject ---
[WARNING] Using platform encoding (Cp1252 actually) to copy filtered resources, i.e. build is platform dependent!
[INFO] Copying 3 resources
[INFO]
[INFO] --- maven-compiler-plugin:3.1:compile (default-compile) @ mage.abmproject ---
[INFO] Nothing to compile - all classes are up to date
[INFO]
[INFO] --- exec-maven-plugin:3.1.0:java (default-cli) @ mage.abmproject ---
[INFO] Using the XML loader.
[INFO] Loading configuration
[INFO] Unable to load external configuration file experiments/DefaultExperimenter.xml, maybe it is internal ?
[INFO] Configuration loaded.
[INFO] [  0.00] Running experiment.
[INFO] [  0.00] ThePlatform/Role/ExperimenterAgent is ACTIVE now.
[INFO] [  0.00] ThePlatform/Role/ActionScheduler is ACTIVE now.
[INFO] [  0.00] ThePlatform/SchedulerRole/ActionScheduler is ACTIVE now.
[INFO] [  0.00] ThePlatform/ExperimenterRole/ExperimenterAgent is ACTIVE now.
[INFO] [  0.00] ThePlatform/Role/HW_Environment is ACTIVE now.
[INFO] [  0.00] HW_Environment/GroupManagerRole/HW_Environment is ACTIVE now.
[INFO] [  0.00] ThePlatform/Role/Bob is ACTIVE now.
[INFO] [  0.00] HW_Environment/BystanderRole/Bob is ACTIVE now.
[INFO] [  4.00] Bob says "Hello World !"
[INFO] [  9.00] Bob says "Hello World !"
[INFO] [ 14.00] Bob says "Hello World !"
[INFO] [ 19.00] Bob says "Hello World !"
[INFO] [ 24.00] Bob says "Hello World !"
[INFO] [ 29.00] Bob says "Hello World !"
[INFO] [ 34.00] Bob says "Hello World !"
[INFO] [ 39.00] Bob says "Hello World !"
[INFO] [ 44.00] Bob says "Hello World !"
[INFO] [ 49.00] Bob says "Hello World !"
[INFO] [101.00] Done.
[INFO] ------------------------------------------------------------------------
[INFO] BUILD SUCCESS
[INFO] ------------------------------------------------------------------------
[INFO] Total time:  13.764 s
[INFO] Finished at: 2022-12-15T12:16:55+04:00
[INFO] ------------------------------------------------------------------------
Press any key to continue...
Commit your MAGE project to git
The initial configuration is done. Now you can make your first commit that create the main branch in your git repository.
First, list the untracked files using git status:
> git status
On branch main

No commits yet

Untracked files:
  (use "git add <file>..." to include in what will be committed)
        .gitignore
        .gitlab-ci.yml
        .m2/
        .mage-api-install.sh
        .mage-execute.sh
        .mage-project-builder.sh
        README.md
        pom.xml
        src/

nothing added to commit but untracked files present (use "git add" to track)
>
Then, use git add . to track them all.
> git add .
warning: in the working copy of '.gitignore', LF will be replaced by CRLF the next time Git touches it
warning: in the working copy of '.gitlab-ci.yml', LF will be replaced by CRLF the next time Git touches it
warning: in the working copy of '.m2/ci_settings.xml', LF will be replaced by CRLF the next time Git touches it
warning: in the working copy of '.mage-execute.sh', LF will be replaced by CRLF the next time Git touches it
warning: in the working copy of '.mage-project-builder.sh', LF will be replaced by CRLF the next time Git touches it
warning: in the working copy of 'README.md', LF will be replaced by CRLF the next time Git touches it
warning: in the working copy of 'pom.xml', LF will be replaced by CRLF the next time Git touches it
warning: in the working copy of 'src/main/java/mage/abmproject/HelloWorldExperimenter.java', LF will be replaced by CRLF the next time Git touches it
warning: in the working copy of 'src/main/resources/experiments/DefaultExperimenter.xml', LF will be replaced by CRLF the next time Git touches it
warning: in the working copy of 'src/main/resources/log4j.properties', LF will be replaced by CRLF the next time Git touches it
warning: in the working copy of 'src/test/resources/log4j.properties', LF will be replaced by CRLF the next time Git touches it
Finally, commit all the staged files.
> git commit -m "Initial commit"
[main (root-commit) b47a2eb] Initial commit
 13 files changed, 483 insertions(+)
 create mode 100644 .gitignore
 create mode 100644 .gitlab-ci.yml
 create mode 100644 .m2/ci_settings.xml
 create mode 100644 .mage-api-install.sh
 create mode 100644 .mage-execute.sh
 create mode 100644 .mage-project-builder.sh
 create mode 100644 README.md
 create mode 100644 pom.xml
 create mode 100644 src/main/java/mage/abmproject/HelloWorldExperimenter.java
 create mode 100644 src/main/resources/experiments/DefaultExperimenter.xml
 create mode 100644 src/main/resources/log4j.properties
 create mode 100644 src/main/resources/mage.api-1.0.0-a.1.jar
 create mode 100644 src/test/resources/log4j.properties
View your MAGE project in your IDE
View in Eclipse IDE
Open your Eclipse IDE.
Click Window > Show View > Other... and type git to filter options.
Choose Git Repositories from the list and click Open.
Go to the Git Repositories view and click Add an existing local Git Repository to this view.
From the pop-up window Add Git Repositories, find and add mage.abmproject.
From the Git Repositories view, right clich on the mage.abmproject repository and click Import Projects...
Eclipse IDE will automatically find your empty project. Just click Finish and your project will be added in the Project Explorer window.
Commit your MAGE project to git
Now, go back to Eclipse IDE, click on the project root on Project Explorer and press F5 to refresh it.
You will see the updated project content.
Click Window > Show View > Other... and type git to filter options.
Choose Git Staging from the list and click Open.
Go to the Git Staging view, click ++ to add all files to Staged Changes, type "Initial commit." as Commit Message, click Add Signed-off by and finally click Commit and Push.
Congratulations! You have created and configured your MAGE project. Now you can start developing.
Check-out and try the HelloWorld project
Before proceeding, let’s download and run the Hello World example.
Go to the GitLab project page of Hello World Tutorial in your browser.
On the project web page, click Clone and then click Clone with HTTP to copy the project git url to the clipboard.
https://gitlab.com/scop-framework/model-library/tutorial/mage.tutorial.helloworld.git
Go to the Git Repositories view in Eclipse IDE and click Clone a Git Repository and add the clone to this view.
Right click on the repository, click Import Projects... and then click Finish. This will import the project into your Project Explorer.
2.1 - SCOP Framework
SCOP Framework allows for building, experimenting and deploying multi-agent systems in Java!
With SCOP, just a few lines of code is all you need to start building agents like an expert.
Prerequisites
Before starting, make sure that all of the necessary requirements listed below have been installed on the system.
- Whatever operating system you are using, start by updating the package index.
> sudo apt update
> choco update
> brew update
- Install the open source distributed version control system
git.
> sudo apt install git
> choco install git
> brew install git
- Install the dependency manager
maven.
> sudo apt install maven
> choco install maven
> brew install maven
- Install the free software package for retrieving files
wget.
> sudo apt install wget
> choco install wget
> brew install wget
- Install the JDK of
Java 21or later.
> sudo apt install openjdk-21-jdk
> choco install java
> brew install java
- Install your favorite
IDE for Java(e.g., Eclipse IDE, IntelliJ IDEA).
In this documentation, we use Eclipse IDE for the examples.
- Install the open source MQTT broker
Mosquitto.
If you want you can install another broker, however you need to give correctly to SCOP its URL.
> sudo apt install mosquitto
> choco install mosquitto
> brew install mosquitto
- Moreover, it is highly recommended to have an account from an open source end-to-end software development platform with built-in version control like GitLab, Github and so on.
In this documentation, we use GitLab since it has built-in version control, issue tracking, code review, CI/CD, and more.
Installation & Setup
In this section, we describe how to create and set up your first SCOP project.
This section is prepared for Windows. If you using Windows, make sure that The Windows Subsystem for Linux (WSL) is activated. For Linux/MacOS, the instructions are very similar.
Create a project on GitLab
Using your browser, sign in to your GitLab account and click create a new blank project.
Give a name to your project such as ABMProject and set the project slug as mage.abmproject.
Note that, the project slug must not contain the character
-as it will be used during project configuration.
Clone the project using git
On the project home page, click Clone and then click Clone with HTTP to copy the project git url to the clipboard.
Open a terminal window and go to the git folder.
> cd git
Type git clone and paste the url from the clipboard.
> git clone https://gitlab.com/ogurcan/mage.abmproject.git
This will fetch the empty project from GitLab. You will to see the following output:
Cloning into 'mage.abmproject'...
remote: Enumerating objects: 3, done.
remote: Counting objects: 100% (3/3), done.
remote: Compressing objects: 100% (2/2), done.
remote: Total 3 (delta 0), reused 0 (delta 0), pack-reused 0
Receiving objects: 100% (3/3), done.
Build your SCOP project
Enter inside the project’s folder.
> cd mage.abmproject
Fetch the project builder script using wget.
> wget https://gitlab.com/scop-framework/mage.template/-/raw/master/.mage-project-builder.sh
This will download .mage-project-builder.sh to the project’s root folder. You will to see the following output:
--2022-12-02 15:45:51--  https://gitlab.com/scop-framework/mage.template/-/raw/master/mage-project-builder.sh
Resolving gitlab.com (gitlab.com)... 172.65.251.78
Connecting to gitlab.com (gitlab.com)|172.65.251.78|:443... connected.
HTTP request sent, awaiting response... 200 OK
Length: 1866 (1.8K) [text/plain]
Saving to: 'mage-project-builder.sh'

mage-project-builder.sh       100%[=================================================>]   1.82K  --.-KB/s    in 0.004s

2022-12-02 15:45:51 (439 KB/s) - 'mage-project-builder.sh' saved [1866/1866]
Execute the script to configure your SCOP project:
> chmod +x .mage-project-builder.sh && ./.mage-project-builder.sh
> .mage-project-builder.sh
>.mage-project-builder.sh
This will download all necessary files, install the required mage.api dependency using Maven and configure the pom.xml file.
Note that it will take the parent folder’s name as
artifactIDinpom.xml.
Verify the project structure
To verify the configuration, first list the project folder contents using the dir command.
> dir
13/12/2022  23:39    <DIR>          .
13/12/2022  23:39    <DIR>          ..
13/12/2022  23:39             1,478 .classpath
13/12/2022  23:39               178 .gitignore
13/12/2022  23:39               497 .gitlab-ci.yml
13/12/2022  23:39    <DIR>          .m2
13/12/2022  23:39               155 .mage-api-install.sh
13/12/2022  23:39               111 .mage-execute.sh
13/12/2022  23:38             2,072 .mage-project-builder.sh
13/12/2022  23:39               541 .project
13/12/2022  23:39    <DIR>          .settings
13/12/2022  23:39             4,909 pom.xml
13/12/2022  23:39             1,296 README.md
13/12/2022  23:39    <DIR>          src
               9 File(s)         11,237 bytes
               5 Dir(s)  329,697,140,736 bytes free
To have a detailed view, now list the tree structure of the project folder using the tree command.
> tree /a /f
Folder PATH listing
Volume serial number is B8B2-6F1E
C:.
|   .classpath
|   .gitignore
|   .gitlab-ci.yml
|   .mage-api-install.sh
|   .mage-execute.sh
|   .mage-project-builder.sh
|   .project
|   pom.xml
|   README.md
|
+---.m2
|       ci_settings.xml
|
+---.settings
|       org.eclipse.jdt.core.prefs
|       org.eclipse.m2e.core.prefs
|
\---src
    +---main
    |   +---java
    |   |   \---mage
    |   |       \---abmproject
    |   |               HelloWorldExperimenter.java
    |   |
    |   \---resources
    |       |   log4j.properties
    |       |   mage.api-1.0.0-a.1.jar
    |       |
    |       \---experiments
    |               DefaultExperimenter.xml
    |
    \---test
        +---java
        \---resources
                log4j.properties
We are done with the script. Delete it.
> rm .mage-project-builder.sh
> del .mage-project-builder.sh
> rm .mage-project-builder.sh
Try executing it out!
To try the default example experimenter, run the .mage-execute.sh script in the project’s root folder.
> ./.mage-execute.sh
> .mage-execute.sh
>.mage-execute.sh
This will execute the HelloWorldExperimenter and will generate the following output.
[INFO] Scanning for projects...
[INFO]
[INFO] -------------------< scop-framework:mage.abmproject >--------------------
[INFO] Building scop-framework.mage.abmproject 0.0.1-SNAPSHOT
[INFO] --------------------------------[ jar ]---------------------------------
[WARNING] The artifact org.slf4j:slf4j-log4j12:jar:2.0.3 has been relocated to org.slf4j:slf4j-reload4j:jar:2.0.3
[INFO]
[INFO] --- maven-resources-plugin:2.6:resources (default-resources) @ mage.abmproject ---
[WARNING] Using platform encoding (Cp1252 actually) to copy filtered resources, i.e. build is platform dependent!
[INFO] Copying 3 resources
[INFO]
[INFO] --- maven-compiler-plugin:3.1:compile (default-compile) @ mage.abmproject ---
[INFO] Nothing to compile - all classes are up to date
[INFO]
[INFO] --- exec-maven-plugin:3.1.0:java (default-cli) @ mage.abmproject ---
[INFO] Using the XML loader.
[INFO] Loading configuration
[INFO] Unable to load external configuration file experiments/DefaultExperimenter.xml, maybe it is internal ?
[INFO] Configuration loaded.
[INFO] [  0.00] Running experiment.
[INFO] [  0.00] ThePlatform/Role/ExperimenterAgent is ACTIVE now.
[INFO] [  0.00] ThePlatform/Role/ActionScheduler is ACTIVE now.
[INFO] [  0.00] ThePlatform/SchedulerRole/ActionScheduler is ACTIVE now.
[INFO] [  0.00] ThePlatform/ExperimenterRole/ExperimenterAgent is ACTIVE now.
[INFO] [  0.00] ThePlatform/Role/HW_Environment is ACTIVE now.
[INFO] [  0.00] HW_Environment/GroupManagerRole/HW_Environment is ACTIVE now.
[INFO] [  0.00] ThePlatform/Role/Bob is ACTIVE now.
[INFO] [  0.00] HW_Environment/BystanderRole/Bob is ACTIVE now.
[INFO] [  4.00] Bob says "Hello World !"
[INFO] [  9.00] Bob says "Hello World !"
[INFO] [ 14.00] Bob says "Hello World !"
[INFO] [ 19.00] Bob says "Hello World !"
[INFO] [ 24.00] Bob says "Hello World !"
[INFO] [ 29.00] Bob says "Hello World !"
[INFO] [ 34.00] Bob says "Hello World !"
[INFO] [ 39.00] Bob says "Hello World !"
[INFO] [ 44.00] Bob says "Hello World !"
[INFO] [ 49.00] Bob says "Hello World !"
[INFO] [101.00] Done.
[INFO] ------------------------------------------------------------------------
[INFO] BUILD SUCCESS
[INFO] ------------------------------------------------------------------------
[INFO] Total time:  13.764 s
[INFO] Finished at: 2022-12-15T12:16:55+04:00
[INFO] ------------------------------------------------------------------------
Press any key to continue...
Commit your SCOP project to git
The initial configuration is done. Now you can make your first commit that create the main branch in your git repository.
First, list the untracked files using git status:
> git status
On branch main

No commits yet

Untracked files:
  (use "git add <file>..." to include in what will be committed)
        .gitignore
        .gitlab-ci.yml
        .m2/
        .mage-api-install.sh
        .mage-execute.sh
        .mage-project-builder.sh
        README.md
        pom.xml
        src/

nothing added to commit but untracked files present (use "git add" to track)
>
Then, use git add . to track them all.
> git add .
warning: in the working copy of '.gitignore', LF will be replaced by CRLF the next time Git touches it
warning: in the working copy of '.gitlab-ci.yml', LF will be replaced by CRLF the next time Git touches it
warning: in the working copy of '.m2/ci_settings.xml', LF will be replaced by CRLF the next time Git touches it
warning: in the working copy of '.mage-execute.sh', LF will be replaced by CRLF the next time Git touches it
warning: in the working copy of '.mage-project-builder.sh', LF will be replaced by CRLF the next time Git touches it
warning: in the working copy of 'README.md', LF will be replaced by CRLF the next time Git touches it
warning: in the working copy of 'pom.xml', LF will be replaced by CRLF the next time Git touches it
warning: in the working copy of 'src/main/java/mage/abmproject/HelloWorldExperimenter.java', LF will be replaced by CRLF the next time Git touches it
warning: in the working copy of 'src/main/resources/experiments/DefaultExperimenter.xml', LF will be replaced by CRLF the next time Git touches it
warning: in the working copy of 'src/main/resources/log4j.properties', LF will be replaced by CRLF the next time Git touches it
warning: in the working copy of 'src/test/resources/log4j.properties', LF will be replaced by CRLF the next time Git touches it
Finally, commit all the staged files.
> git commit -m "Initial commit"
[main (root-commit) b47a2eb] Initial commit
 13 files changed, 483 insertions(+)
 create mode 100644 .gitignore
 create mode 100644 .gitlab-ci.yml
 create mode 100644 .m2/ci_settings.xml
 create mode 100644 .mage-api-install.sh
 create mode 100644 .mage-execute.sh
 create mode 100644 .mage-project-builder.sh
 create mode 100644 README.md
 create mode 100644 pom.xml
 create mode 100644 src/main/java/mage/abmproject/HelloWorldExperimenter.java
 create mode 100644 src/main/resources/experiments/DefaultExperimenter.xml
 create mode 100644 src/main/resources/log4j.properties
 create mode 100644 src/main/resources/mage.api-1.0.0-a.1.jar
 create mode 100644 src/test/resources/log4j.properties
View your SCOP project in your IDE
View in Eclipse IDE
Open your Eclipse IDE.
Click Window > Show View > Other... and type git to filter options.
Choose Git Repositories from the list and click Open.
Go to the Git Repositories view and click Add an existing local Git Repository to this view.
From the pop-up window Add Git Repositories, find and add mage.abmproject.
From the Git Repositories view, right clich on the mage.abmproject repository and click Import Projects...
Eclipse IDE will automatically find your empty project. Just click Finish and your project will be added in the Project Explorer window.
Commit your SCOP project to git
Now, go back to Eclipse IDE, click on the project root on Project Explorer and press F5 to refresh it.
You will see the updated project content.
Click Window > Show View > Other... and type git to filter options.
Choose Git Staging from the list and click Open.
Go to the Git Staging view, click ++ to add all files to Staged Changes, type "Initial commit." as Commit Message, click Add Signed-off by and finally click Commit and Push.
Congratulations! You have created and configured your SCOP project. Now you can start developing.
Check-out and try the HelloWorld project
Before proceeding, let’s download and run the Hello World example.
Go to the GitLab project page of Hello World Tutorial in your browser.
On the project web page, click Clone and then click Clone with HTTP to copy the project git url to the clipboard.
https://gitlab.com/scop-framework/model-library/tutorial/mage.tutorial.helloworld.git
Go to the Git Repositories view in Eclipse IDE and click Clone a Git Repository and add the clone to this view.
Right click on the repository, click Import Projects... and then click Finish. This will import the project into your Project Explorer.
2.2 - Running on Docker
Running on Docker
This guide provides instructions for building and running simulations using Docker for the SCOP Framework.
Prerequisites
Before you begin, make sure you have the following installed on your system:
- Docker (tested on version 4.35.0)
- An active internet connection to pull base images and dependencies.
Required Files
Ensure that the following file is present in your working directory:
Dockerfile(located in the root directory of your project)
The Dockerfile contains the instructions necessary to build the Docker image that will run your simulation.
Build the Docker Image
To build the Docker image, run the following command in your terminal:
docker build --no-cache -t model-name .
--no-cache: Ensures that the build process does not use any cached layers.- Replace
model-namewith the desired name for your Docker image.
This process may take some time depending on the complexity of your Dockerfile and the dependencies required.
Run the Docker Image as a Detached Container
After building the image, run it as a detached container using:
docker run -d --name model-name-container model-name
-d: Runs the container in detached mode (in the background).--name model-name-container: Sets the name of the running container tomodel-name-container(you can change this to any name you prefer).model-name: Refers to the Docker image you built earlier.
Verify the Running Container
To verify that your container is running, use:
docker ps
- This command lists all active containers. Look for
model-name-containerin the output to confirm that your container is running.
View Container Logs
To view the logs generated by your running container, use:
docker logs model-name-container
- This command helps you monitor the output of your simulation and is useful for debugging any issues.
Stop the Running Container
When you need to stop the container, use:
docker stop model-name-container
- This will gracefully stop the container named
model-name-container.
Additional Tips
-
Restart a Stopped Container: If you want to restart a stopped container, use:
docker start model-name-container -
Remove a Container: To remove a container after it has stopped, use:
docker rm model-name-container -
Remove an Image: If you need to remove the Docker image, use:
docker rmi model-name
By following these steps, you will be able to build, run, monitor, and manage Docker containers for the SCOP Framework simulations. Adjust the commands and options as needed to suit your specific project requirements.
2.3 - Running on HPC
This guide covers three scenarios for running the SCOP Framework on HPC systems using SLURM:
- Java and Maven are available on the HPC system.
- Maven is not available on the HPC system (requiring a locally built fat JAR).
- Both Java and Maven are not available on the HPC system (requiring Java installation with EasyBuild).
Checking Available Modules
To verify if the required modules (Java/21.0.2 and Maven/3.9.9) are installed on the HPC, follow these steps:
Check for Java
module avail Java
This command will list all available Java modules. Look for Java/21.0.2 in the output.
Check for Maven
module avail Maven
This command will list all available Maven modules. Look for Maven/3.9.9 in the output.
Case 1: Java and Maven Are Available on the HPC System
In this scenario, both Java and Maven are installed on the HPC environment, allowing you to build and run the SCOP Framework directly on the cluster.
Clone the Repository and Build the Project
- Clone the repository of
your modeland build it using Maven:git clone https://github.com/your-repo/your-model.git cd your-model mvn clean install - This step compiles the Java code and packages the application into a runnable JAR file (typically
target/your-model.jar).
Create a SLURM Job Script
- Write a job script to run the application, specifying the Java JAR file:
#!/bin/bash ## Set up the job # Note: Adjust the sbatch settings as needed #SBATCH --nodes=8 #SBATCH --time=00:05:00 #SBATCH --qos=devel #SBATCH --account=account_name # Load Java and Maven modules module --quiet purge # Reset the modules to the system default module load Java/21.0.2 # Loading Java 21 module load Maven/3.9.9 # Loading Maven 3.9.9 # Navigate to the your model's directory cd /path/to/your-model # Run the simulation using the JAR file # Note: Adjust the memory settings (-Xms and -Xmx) as needed java -Xms1g -Xmx32g -jar target/your-model.jar exec-cli echo $SLURM_SUBMIT_DIR exit 0 - Save this script as
run_your_model_on_hpc.sh.
Submit the Job
- Submit the job using the
sbatchcommand:sbatch run_your_model_on_hpc.sh
Check the Job
- Check the status of the job using the
squeuecommand:squeue -u your_username
Case 2: Maven Is Not Available on the HPC System
In this scenario, Maven is not available on the HPC, so the build process must be done locally (on a development machine), and then the resulting “fat JAR” is transferred to the HPC system.
Build a Fat JAR Locally
- On your local machine (with Maven installed), navigate to the project repository and build a fat JAR that includes all dependencies:
mvn clean compile package -Pshade -DskipTests - This will generate a “fat JAR” file that includes all required libraries and dependencies, typically found in the
targetfolder, e.g.,target/your-model-version-fat.jar.
Transfer the Fat JAR to the HPC
- Use
scporrsyncto copy the fat JAR to the HPC machine:scp target/your-model-version-fat.jar your_username@hpc.server.com:/path/to/hpc/folder
Create a SLURM Job Script
- On the HPC, write a job script to run the fat JAR:
#!/bin/bash ## Set up the job # Note: Adjust the sbatch settings as needed #SBATCH --nodes=8 #SBATCH --time=00:05:00 #SBATCH --qos=devel #SBATCH --account=account_name # Load Java and Maven modules module --quiet purge # Reset the modules to the system default module load Java/21.0.2 # Loading Java 21 # Navigate to the your model's directory cd /path/to/your-model # Run the simulation using the JAR file # Note: Adjust the memory settings (-Xms and -Xmx) as needed java -Xms1g -Xmx32g -jar target/your-model-version-fat.jar exec-cli echo $SLURM_SUBMIT_DIR exit 0 - Save this script as
run_your_model_on_hpc.sh.
Submit the Job
- Submit the job using the
sbatchcommand:sbatch run_your_model_on_hpc.sh
Check the Job
- Check the status of the job using the
squeuecommand:squeue -u your_username
Case 3: Java and Maven Are Not Available on the HPC System
In this scenario, neither Java nor Maven is available on the HPC system, so Java needs to be installed using EasyBuild, and a fat JAR must be generated locally.
Create an EasyBuild Script to in Java 21
- On the HPC, create an EasyBuild script to install Java 21:
easyblock = 'Binary' name = 'JDK' version = '21' toolchain = {'name': 'foss', 'version': '2023b'} # Adjust based on your available toolchains. homepage = 'https://www.oracle.com/java/' description = "Oracle JDK 21 - Java Development Kit" source_urls = ['https://download.oracle.com/java/23/latest/'] sources = ['jdk-21_linux-x64_bin.tar.gz'] # Adjust the installation prefix as necessary #install_path = '/cluster/home/ogurcan/software/OracleJDK-23' # Dependencies if needed dependencies = [] # License (if applicable) license_file = 'LICENCE' # Adjust this to ensure proper extraction and installation install_cmd = 'tar -xzf jdk-21_linux-x64_bin.tar.gz -C %(installdir)s' sanity_check_paths = { 'files': ['jdk-21.0.1/bin/java', 'jdk-21.0.1/bin/javac'], 'dirs': ['jdk-21.0.1/lib'] } moduleclass = 'lang' - Save this script as
JDK-21.eb.
Install Java 21 Using EasyBuild
- Use the EasyBuild script to generate the module file:
eb JDK-21.eb --prefix=/path/to/install/directory
Load the Installed Java Module
- Load the newly installed Java 21 module:
module use /path/to/install/directory/modules/all
module load Java/21
Add Java to your PATH
- Manually add the JDK 23 bin directory to your
PATH:bash export PATH=/path/to/install/directory/JDK/21.0.1/jdk-21.0.1/bin/:$PATH - Verify that Java is installed correctly:
java -version
Continue from Case 2
- Now that Java loaded, go to Case 2, and follow the steps.
Conclusion
In all cases, adjust paths and module names according to the specific setup of your HPC environment.
For more information on SLURM, refer to the SLURM documentation.
3 - Model Library
SCOP Framework comes with a Model Library where you can find example models and their code. They are examples of coding, modular model building and documentation practice. Each model is an independent maven project. Just clone a project and use it.
Model Library is located under SCOP Framework’s Model Library Gitlab group.
4 - Environment
Overview
Environment is a first-class abstraction in the modeling and engineering of complex computational systems, such as pervasive, adaptive, and multi-agent systems [Weyns]. It is usually modeled through the resource abstraction, as a non-goal-driven entity producing events and/or reactively waiting for requests to perform its function. Environment is essential in coordination since it works as a mediator for agent interaction through which agents can communicate and coordinate indirectly. It is active; featuring autonomous dynamics, and affecting agent coordination. It has a structure; requiring a notion of locality, and allowing agents of any sort to move through a topology.
To this end, Environment is modeled as an agent. Environment is mainly in charge of
- allocating physical addresses (e.g., coordinate address) and/or logical addresses (e.g., agent address, wallet address or even alias) to agents and artifacts and,
- mediating agent-agent and agent-artifact interaction through these addresses.
Defining an Environment
In this generic implementation, there is no limitation about the number of agents and/or artifacts that can be allocated to an address (e.g., in a Grid environment several agents may be at the same position). Similarly, there is also no limitation about the number of addresses an agent can allocate (e.g., in a Bitcoin environment an agent may have several wallet addresses).
To create a generic environment, do simply the following inside the setup() method of a Mage agent.
public class MyMage extends Mage {

	@Override
	protected void setup() {
		// create an environment named "MyEnvironment"
		Environment environment = create(new Environment("MyEnvironment"));
         ...
    }
    ...
}
Adding Agents to an Environment
To create agents for the environment, nothing special needs to be done.
1. Create Agents
Agents can be created one by one:
Agent agent = create(new Agent() {
    //... agent setup code ...
});
or in a loop, usually for a desired amount of agent count:
for (int i = 0; i < numOfAgents; i++) {
    Agent agent = create(new Agent() {
        //... agent setup code ...
    });
}
2. Add Agents to the Environment
After an agent is created, it can be added to the environment using the add method of the GroupManager role:
environment.as(Groupanager.class).add(agent).execute();
Upon being added to the grid environment, the GroupManager role assigns the Communicator role to the agents so that they can communicate with other agents in the same environment.
4.1 - Grid Environment
Overview
In MAGE, a grid environment refers to a spatial structure where the world or space is divided into a set of discrete cells in the shape of a grid (like a chessboard). This grid provides a framework in which agents can move, interact, and make decisions. Here are some key points about grid environments in MAGE:
-
Discrete Cells: Each cell in the grid can contain (or not contain) one or several agents. For example, in a simulation of forest fire spread, each cell might contain a tree agent of forest that can play a combustible roles whose state can be in one of several states: unburned, burning, or burned.
-
Agent Interaction: Agents in the simulation move across the grid and interact with each other or with the cells themselves based on their position. Their interactions might be governed by rules related to their proximity to other agents or specific cell attributes.
-
Boundaries: The grid have hard boundaries where agents can’t move beyond the edge of the grid.
-
Scale and Granularity: The size of the cells in the grid and the overall dimensions of the grid determine the scale and granularity of the simulation. Smaller cells can provide more detail but may require more computational resources.
-
Neighborhoods: The concept of “neighborhood” is crucial in grid environments. A neighborhood refers to the set of cells surrounding a given cell. Agents might interact with or be influenced by agents in their neighborhood. The definition of a neighborhood can vary; for instance, it might include only directly adjacent cells (von Neumann neighborhood) or might also include diagonally adjacent cells (Moore neighborhood).
-
Dynamics: The state of cells in the grid is dependent on the agents occupying them and can change over time based on certain rules or interactions among agents. For instance, in the classic Game of Life simulation, agents in the cells can “live” or “die” based on the number of agents in the neighboring cells that are alive.
-
Heterogeneity: While the grid provides a structured environment, the agents moving within it can be heterogeneous, meaning they can have diverse roles (i.e. attributes, behaviors, and decision-making rules).
In summary, a grid environment in MAGE offers a structured spatial framework that facilitates agent interactions, movement, and decision-making. This kind of environment is particularly useful in simulations where spatial relationships and interactions are critical, such as in ecology, urban planning, and epidemiology.
Defining of a Grid Environment
In MAGE, a grid environment is defined using the GridEnvironment agent.
2. Define the Grid Size
The grid size (number of rows and columns) and the cell size must be defined as parameter in the config.json file:
...
"MyGridEnvironment" : {
    "GRID_NUMBER_OF_COLUMNS" : {
      "type" : "integer",
      "description" : " The integer value that represents the number of columns for the environment.",
      "exclusiveMinimum" : 0,
      "multipleOf" : 1,
      "default" : 50,
      "displayName" : "Number of Columns",
      "value" : 50
    },
    "GRID_NUMBER_OF_ROWS" : {
      "type" : "integer",
      "description" : " The integer value that represents the number of rows for the environment.",
      "exclusiveMinimum" : 0,
      "multipleOf" : 1,
      "default" : 50,
      "displayName" : "Number of Rows",
      "value" : 50
    },
    "GRID_CELL_SIZE" : {
      "type" : "integer",
      "description" : "The integer value that represents the size of each cell in the grid.",
      "minimum" : 6,
      "maximum" : 14,
      "multipleOf" : 1,
      "default" : 8,
      "displayName" : "Cell size",
      "value" : 12
    }
  },
...
3. Create the Grid Environment
Within the setup method of the Mage of the simulation model, an instance of GridEnvironment is created, which is named “MyGridEnvironment”:
var environment = create(new GridEnvironment("MyGridEnvironment"));
Adding Agents to a Grid Environment
To create agents for the grid environment, nothing special needs to be done.
1. Create Agents
Agents can be created one by one:
Agent agent = create(new Agent() {
    //... agent setup code ...
});
//... environment add code ...
or in a loop, usually that iterates over the total number of cells in the grid (rows multiplied by columns):
for (int i = 0; i < numOfRows * numOfColumns; i++) {
    Agent agent = create(new Agent() {
        //... agent setup code ...
    });
    //... environment add code ...
}
2. Add Agents to the Grid
After an agent is created, it can be added to the grid environment using the add method of GridEnvironment which adds the agent to the next grid cell:
environment.add(agent);
using the add method of GridEnvironment which adds the agent to a grid cell at a specific location in the grid:
environment.add(agent, row, column);
Upon being added to the grid environment, GridEnvironment assigns the GridElement role to the agents.
Agent Behaviors in a Grid Environment
The GridElement role in the SCOP Framework provides a set of behaviors that an agent can perform in a grid environment. These behaviors enable the agent to interact with the environment, move within it, and gather information about neighboring agents.
1. Getting the Current Cell
The agent can get its current cell in the grid environment using:
public GridCell getCell();
2. Setting the Current Cell
The agent can set its current cell in the grid environment using:
public void setCell(GridCell gridCell);
3. Fetching Neighboring Agents
The agent can retrieves a list of all agents in the neighboring cells of the agent’s current cell using:
final public List<Agent> getNeighborAgents();
The agent can retrieve a list of agents of a specific type in the neighboring cells of the agent’s current cell using:
final public <T extends Agent> List<T> getNeighborAgents(Class<T> agentType);
As well as, the agent retrieves a list of all agent in the neighboring cells with in a range using:
final public List<Agent> getNeighbourAgents(int range);
It can also retrieve a list of agents of a specific type using:
final public <T extends Agent> List<T> getNeighbourAgents(Class<T> agentType, int range)
4. Moving the Agent
The agent can move to specific row and column in the grid using:
public Action moveTo(int row, int column);
The agent can move towards a specific direction (e.g., NORTH, SOUTH, EAST, WEST) in the grid using:
public Action moveTo(Direction direction);
5. Wandering the Agent
The agent can move around in the grid without a specific course, aim or goal by either sweeping the grid:
final public Action sweep();
or doing a random walk using its four neighbors:
final public Action randomWalk4();
or doing a random walk using its eight neighbours:
final public Action randomWalk8();
6. Upcoming Methods
The following methods are marked as deprecated, meaning they have not been implemented yet:
-
Move Towards a Target Cell:
@Deprecated
public Action moveTowardTarget(GridCell target);
This method is intended to move the agent one point towards a target cell, but it’s not yet implemented.
-
Move to a GridCell Instance:
@Deprecated
final public Action moveTo(GridCell gridCell);
This method is intended to move the agent to a specific GridCell instance, but it’s not yet implemented.
By using these behaviors, agents can actively navigate and interact within the grid environment in the SCOP Framework.
4.2 - Geographical Environment
Overview
In MAGE, a geographical environment refers to a spatial structure that represents the world or space as a continuous and varied landscape, rather than being divided into discrete cells. This environment provides a naturalistic framework in which agents can move, interact, and make decisions. Here are some key points about geographical environments in MAGE:
-
Continuous Space: Unlike the grid-based approach, the geographical environment does not constrain agents to discrete cells. For example, in a simulation of wildlife migration, agents representing animals can move freely across a continuous landscape, encountering various terrains such as forests, rivers, and mountains that affect their behavior and movement.
-
Agent Interaction: Agents in the simulation navigate the landscape, interacting with each other and the environment based on their location. These interactions can be influenced by geographical features and distances, with rules that might consider the terrain’s impact on visibility, movement speed, and resource availability.
-
Boundaries: The geographical environment can have natural boundaries, such as oceans, mountain ranges, or rivers, which limit the movement of agents or define their habitats.
-
Scale and Granularity: The resolution of the geographical data and the scale of the simulation determine its detail and computational requirements. High-resolution data allows for more detailed simulations but requires greater computational resources.
-
Variability: Geographical environments inherently include a variety of terrains and ecosystems, offering a rich context for agent interactions. Agents might experience different conditions based on their location, such as varying weather, terrain ruggedness, and resource availability.
-
Dynamics: The state of the environment and its components can change over time, influenced by natural processes or the actions of agents within the simulation. For example, vegetation might grow or be consumed by herbivores, and rivers might change course.
-
Heterogeneity: Agents operating within a geographical environment can be highly diverse, with different species or entities having unique attributes, behaviors, and decision-making processes that are influenced by the environment.
In summary, a geographical environment in MAGE offers a realistic and dynamic spatial framework that supports complex agent interactions and decision-making. This type of environment is especially valuable in simulations that aim to mimic real-world ecological systems, geological processes, or human-environment interactions, where the continuous and varied nature of the landscape plays a critical role.
Defining of a Geographical Environment
In MAGE, a geographical environment is defined using the GeoEnvironment agent.
1. Create the Geographical Environment
Within the setup method of the Mage of the simulation model, an instance of GeoEnvironment is created, which is named “MyGeoEnvironment”:
var environment = create(new GeoEnvironment("MyGridEnvironment"));
Adding Agents to a Geographical Environment
To create agents for the grid environment, nothing special needs to be done.
1. Create Agents
Agents can be created one by one:
Agent agent = create(new Agent() {
    //... agent setup code ...
});
//... environment add code ...
or in a loop, usually that iterates over the total number of cells in the grid (rows multiplied by columns):
for (int i = 0; i < numOfRows * numOfColumns; i++) {
    Agent agent = create(new Agent() {
        //... agent setup code ...
    });
    //... environment add code ...
}
2. Add Agents to the Grid
After an agent is created, it can be added to the grid environment using the add method of GeoEnvironment which adds the agent to the next grid cell:
environment.add(agent, latitude, longitude);
Upon being added to the geographical environment, GeoEnvironment assigns the GeoElement role to the agents.
Agent Behaviors in a Grid Environment
The GridElement role in the SCOP Framework provides a set of behaviors that an agent can perform in a grid environment. These behaviors enable the agent to interact with the environment, move within it, and gather information about neighboring agents.
1. Getting the Current Position
The agent can get its current cell in a geographical environment using:
final public double getLatitude();

final public double getLongitude();
2. Setting the Current Position
The agent can set its current position in a geographical environment using:
final public void setPosition(double latitude, double longitude);
3. Moving the Agent
The agent can move to specific row and column in a geographical environment using:
final public Action moveTo(double latitude, double longitude);
The agent can move towards a specific direction (e.g., NORTH, SOUTH, EAST, WEST) in the grid using:
final public Action moveTo(Direction direction);
4. Wandering the Agent
The agent can move around in a geographical environment without a specific course, aim or goal by either sweeping the grid:
final public Action sweep();
or doing a random walk using its four neighbors:
final public Action randomWalk4();
or doing a random walk using its eight neighbours:
final public Action randomWalk8();
5. Upcoming Methods
The following methods are marked as deprecated, meaning they have not been implemented yet:
-
Move Towards a Target Position:
@Deprecated
public Action moveTowardTarget(double targetLatitude, double targetLongitude);
By using these behaviors, agents can actively navigate and interact within a geographical environment in the SCOP Framework.
5 - Communication
Communication between agents is an essential part of SCOP Framework. It is important because it allows the agents to interact with each other and share information. This helps the agents to make better decisions and also helps to form more realistic simulations of complex systems. Communication between agents also allows for emergent behavior to develop, which can be used to create more realistic simulations of the real world. By allowing agents to interact with each other, the simulated environment can become more dynamic and responsive to changes in the environment or the agents, allowing for more realistic simulations of complex systems.
For effective communication, SCOP Framework uses a well defined addressing scheme. Based on this scheme, SCOP Framework currently supports two types of communication:
- (1) through a multi-threaded scheme using shared message queues, and
- (2) using one of the most widely used communication protocols in the IoT and Cloud Community called MQTT.
5.1 - Identifiers
Overview
All agents have dedicated identifiers identifying them within environments with respect to each role they are playing in each environment.
The agent identifier structure is represented by the Identifier class. This class simply stores the name of the agent, the role it is playing and the environment where it plays the role.
Identifier implements the Serializable interface because it can be put inside Message objects that are communicated through a network.
Understanding identifiers
When an agent takes a role, a corresponding unique Identifier is assigned.
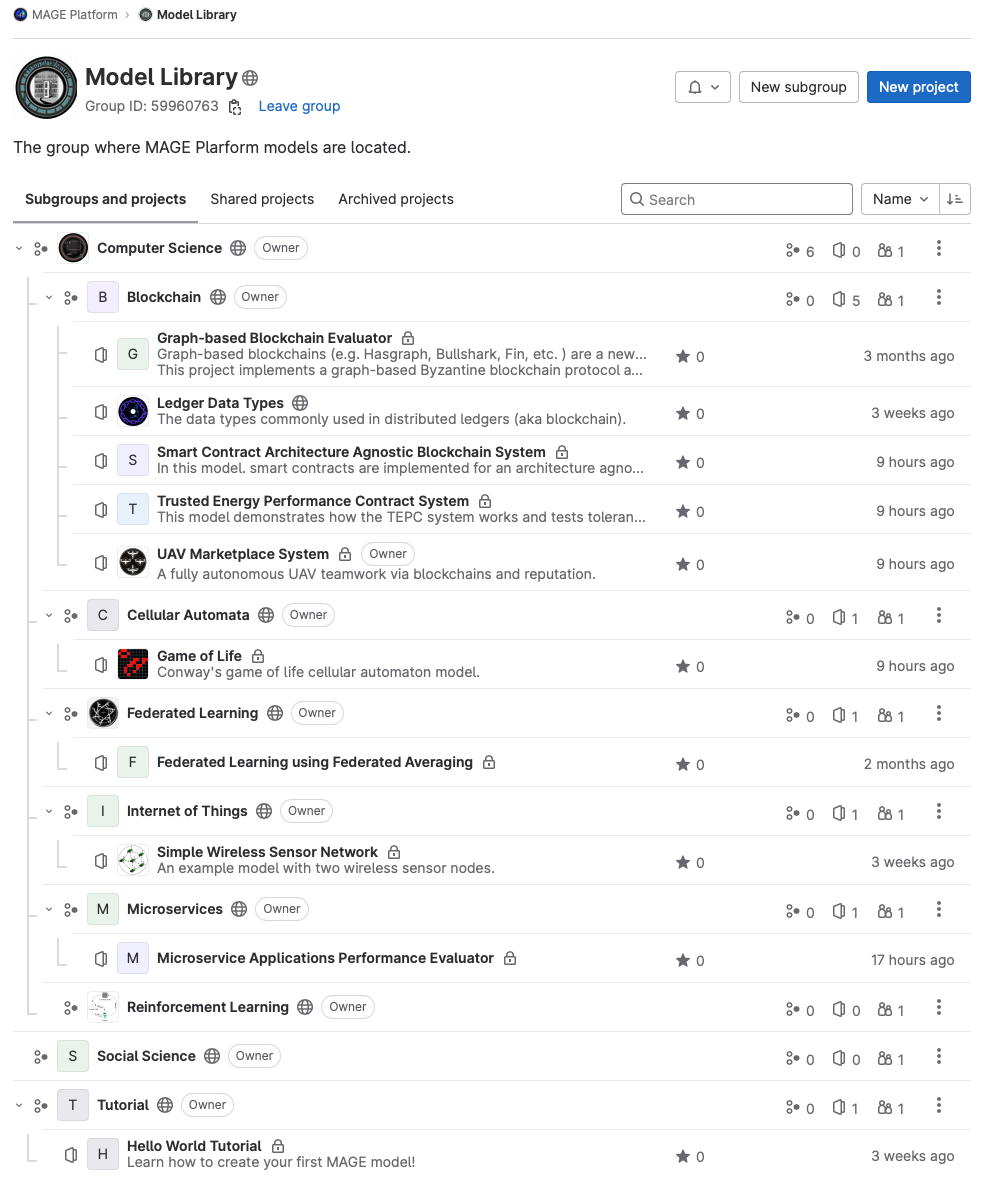
For example, when an agent called Bob takes Bystander from HW_Environment at tick 0 as follows:
...
var agent = new Agent("Bob") {

	@Override
	protected void setup() {
		// create the bystander role for playing inside hwEnvironment
		new Bystander(this, hwEnvironment);
		...
	}
};
...
SCOP Framework will assign this role the following Identifier:
HW_Environment/Bystander/Bob
Hereafter, the other agents can communicate with the Bystander of the Bob agent using this address through HW_Environment.
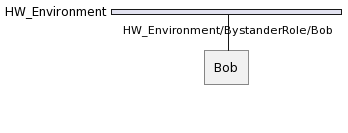
If another agent called Carl plays the same role in HW_Environment, we will have following situation:
Getting an Identifier
Agent identifiers are uniquely assigned for each role. To get the identifier of a specific role, all you need to is to call the getIdentifier() method inside one of the actions of that role.
...
public class Bystander extends Role {

	...

	public Action anAction() {
		return new Action(this) {
			@Override
			public void execute() {
				...
				Identifier myIdentifier = getIdentifier();
				...
			}
		};
	}

}
If you are not inside that dedicated role object, but you still need to get the agent identifier, you can simply construct it by yourself:
...
Identifier myIdentifier = new Identifier("HW_Environment", Bystander.class, "Bob");
...
However, this should be done with great care, as a single mistake will unable the communication.
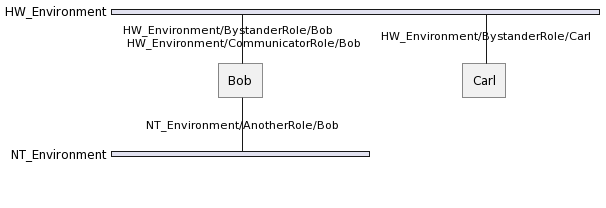
Having multiple identifiers
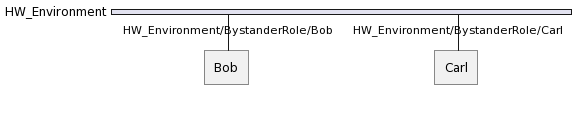
An agent can play multiple roles in the same environment and thus can have multiple agent identifiers dedicated to each role it plays in that environment.
For example, supposing that Bob plays also Communicator in HW_Environment yields the following:
An agent can also play multiple roles in different environments and thus can have multiple agent identifiers dedicated to each role it plays in the dedicated environment.
Hence, supposing that Bob plays AnotherRole in NT_Environment yields the following situation:
5.2 - Messaging
Overview
Communication between agents is established by exchanging Message objects.
An Message is a discrete unit of communication intended by the source for consumption by some receiver(s) or group of receivers.
It is ignorant to the agents and artifacts and deals only with their addresses.
Preparing a Message
When an agent wants to communicate with other agents, it has prepare an Message object as below by specifying the at least one receiver’s Identifier in the Message object.
For example, an agent can prepare a TYPE message for sending a String Hi there! payload to another agent called Carl as below:
Identifier sender = getIdentifier();
String paylaod = "Hi there!";
Identifier receiver = new Identifier("HW_Environment", Bystander.class, "Carl");
var message = new Message<String>("PING", sender, payload, receiver);
Here it should be noted that this aMessage is targeting Bystander of Carl. and it will be handled directly with that role.
If Carl leaves the corresponding role (i.e. the role is inactive), then his Identifier becomes inactive and message no longer reaches Bystander of Carl.
That is to say, an agent message sent to a dedicated
Identifierwill not be delivered to the corresponding receiver role if the receiver agent has left the related role.
Sending a Message
To enable seamless communication between different agents, the SCOP Framework provides a simple and effective way to send messages using the sendMessage method, as illustrated by the following code snippet:
as(Communicator.class).sendMessage(message);
The as(Communicator.class) portion of the code is used to access the communication capabilities of an agent within the same environment of the role that call it. This syntax allows the agent to assume the role of a “Communicator” to send messages.
The sendMessage(Message) method is a built-in function provided by the SCOP Framework’s Communicator role. It serves as the primary mechanism for transmitting messages from one agent to another.
Receiving a Message
To receive a specific type of message, the dedicated role must implement a handler method whose signature as public void handleTYPEmessage(Message message) where TYPE is the type of the message. For instance, the aforementioned PING message can be handles as below:
public class Bystander extends Role {

   ...

   public void handlePINGMessage(Message message) {
      // code to handle the message
   }
}
The rest is managed by the SCOP Framework and the sent message is delivered to the dedicated handle methods. As a developer, you do not need to do anything else.
Note that, if the handler message is not implemented, the send messages will be lost.
6 - Reference
This is a placeholder page that shows you how to use this template site.
If your project has an API, configuration, or other reference - anything that users need to look up that’s at an even lower level than a single task - put (or link to it) here. You can serve and link to generated reference docs created using Doxygen,
Javadoc, or other doc generation tools by putting them in your static/ directory. Find out more in Adding static content. For OpenAPI reference, Docsy also provides a Swagger UI layout and shortcode that renders Swagger UI using any OpenAPI YAML or JSON file as source.
6.1 - Testing Reference
Introduction
The SCOP Framework, as inferred from the code provided, is likely a simulation or agent-based framework. Testing in the SCOP Framework is integral to verify that agents and simulations perform as intended. JUnit 5, a prevalent Java testing framework, is employed in the example to specify, run, and validate tests.
Setting Up
- Import necessary libraries: Incorporate the pertinent JUnit 5 and MAGE packages.
- Annotations: Use JUnit annotations like
@Test,@BeforeEach, and@DisplayNameto delineate your test scenarios. - Temporary directories: Through the
@TempDirannotation, JUnit allows the creation of temporary directories. This can be advantageous when there’s a need to produce and manage files or directories mid-test.
Writing Test Cases
Initialization
Utilize the @BeforeEach annotation to designate methods that initiate before each test, like how beforeEach() is employed to reset any simulation parameters.
Test Case Structure
- Define the test: Label a method with
@Testto indicate it as a test case. - Descriptive naming:
@DisplayNamecan be used to ascribe a significant name to your test, aiding in clarity. - Crafting test scenarios: Within the test case, illustrate the behavior of the agents as a simulation scenario.
Assertions
When making assertions within MAGE, one typically does so from the viewpoint of the Tester role. The MAGE agent play this role by default and to make these assertions it is sufficient to invoke the as(Tester.class) method.
The Tester role provides all of the JUnit’s assertion methods, such as assertEquals, assertTrue, however, within the SCOP Framework, assertions aren’t executed immediately as they would be in a typical JUnit context. Instead, they’re scheduled to run later during the simulation. This is pivotal because it allows the simulation to progress and reach the desired state before the assertions are checked.
Execute the test
The utility method launchTester() should be used to trigger the test simulation and furnish the necessary parameters.
Tips
Dependency Injection
Capitalize on JUnit’s capability to infuse parameters into test methods. For instance, TestInfo delivers runtime data about the ongoing test.
Encapsulation
It’s paramount to encapsulate and segregate the actions within each test, ensuring that tests don’t meddle with one another.
Tidy Up
The @AfterEach annotation (not depicted in the sample) can be utilized to create methods that clear resources post-test execution.
Conclusion
Testing within the SCOP Framework offers a structured method to verify the behavior of simulations and agents. By specifically activating the Tester role through as(Tester.class), you obtain the necessary perspective and permissions to test effectively within the MAGE context. Integrating JUnit 5 ensures a robust framework to define, execute, and validate tests, thus affirming the reliability and accuracy of your agents and simulations.
6.2 - Logging Reference
Overview
Logging is an essential part of SCOP Framework. It helps to track the progress of the experiments, identify potential problems, and debug issues. Logging information can also be used to measure performance and analyze the results of the experiments.
Additionally, it can be used to compare the results of different experiments and to identify the most effective approaches. Logging also helps to protect the integrity of the experiments, as it can be used to detect any malicious or fraudulent activities.
Finally, logging is essential for testing and validating the experiments, allowing developers to ensure that the experiments are running as expected.
For effective logging, SCOP Framework uses one of the most widely used logging frameworks in the Java Community called Logback. Logback offers a fast implementation, provides several options for configuration, and flexibility in archiving old log files.
Logback in SCOP Framework
The Logback structure consists of three components: Logger, Appender, and Layout.
- Logger is the context for the log messages and is what applications interact with in order to generate the log messages.
- Appender is responsible for placing log messages in their final locations. It is not uncommon for a Logger to have multiple Appenders attached to it. Logback provides the capability to attach Appenders to more than just text files.
- Layout facilitates the production of messages for outputting. Logback provides the means to craft user-defined classes for formatting messages, in addition to comprehensive configuration possibilities for the current ones.
Maven Dependency
For logging messages, SCOP Framework adds Logback to pom.xml:
...
<properties>
   ...
   <logback.version>1.5.1</logback.version>
   ...
</properties>
...
<dependencies>
   ...
   <dependency>
			<groupId>ch.qos.logback</groupId>
			<artifactId>logback-classic</artifactId>
			<version>${logback.version}</version>
	 </dependency>
   ...
</dependencies>
...
Classpath
This installs the following dependencies to your project’s classpath.
+-Maven Dependencies
 \- ...
 \- logback-classic:jar:1.5.1.jar
 \- logback-core:jar:1.5.1.jar
 \- ...
 \- org.slf4j:slf4j-api:jar:1.7.30.jar
 \- ...
SLF4J (the Simple Logging Facade for Java) is used by Logback as its native interface.
Configuration File
There is a default logback.xml located under src/main/resources.
<configuration>
    <!-- Remove completely the status-information of Logback -->
    <statusListener class="ch.qos.logback.core.status.NopStatusListener" />

    <!-- Console Appender -->
    <appender name="STDOUT" class="ch.qos.logback.core.ConsoleAppender">
        <encoder>
            <pattern>%d{HH:mm:ss.SSS} [%-5level] [%-20logger{35}] %msg%n</pattern>
        </encoder>
    </appender>

    <!-- Root Logger -->
    <root level="info">
        <appender-ref ref="STDOUT" />
    </root>
</configuration>
Thanks to this logback.xml file, SCOP Framework projects can generate log messages and modify the configuration of the loggers.
Debugging Using Logback
SCOP Framework models can get complicated, so there are several built-in Logback mechanisms for troubleshooting.
Troubleshooting Logback Configuration
Firstly, we need to ensure that Logback is correctly configured. To do so, we can turn on debug logging and remove NopStatusListener:
<configuration debug="true">
	<!-- Remove completely the status-information of Logback
	<statusListener class="ch.qos.logback.core.status.NopStatusListener" /> -->
  ...
</configuration>
As Logback processes the configuration, it will display status updates in the console.
22:42:56,864 |-INFO in ch.qos.logback.classic.LoggerContext[default] - Could NOT find resource [logback-test.xml]
22:42:56,864 |-INFO in ch.qos.logback.classic.LoggerContext[default] - Found resource [logback.xml] at [file:/C:/Users/Onder.Gurcan/git/mage.abmproject/target/classes/logback.xml]
22:42:56,865 |-WARN in ch.qos.logback.classic.LoggerContext[default] - Resource [logback.xml] occurs multiple times on the classpath.
22:42:56,865 |-WARN in ch.qos.logback.classic.LoggerContext[default] - Resource [logback.xml] occurs at [file:/C:/Users/Onder.Gurcan/git/mage.abmproject/target/classes/logback.xml]
22:42:56,865 |-WARN in ch.qos.logback.classic.LoggerContext[default] - Resource [logback.xml] occurs at [jar:file:/C:/Users/Onder.Gurcan/.m2/repository/scop-framework/mage.api/1.0.0-a.1/mage.api-1.0.0-a.1.jar!/logback.xml]
22:42:56,996 |-INFO in ch.qos.logback.classic.joran.action.ConfigurationAction - debug attribute not set
22:42:56,997 |-INFO in ch.qos.logback.core.joran.action.AppenderAction - About to instantiate appender of type [ch.qos.logback.core.ConsoleAppender]
22:42:57,007 |-INFO in ch.qos.logback.core.joran.action.AppenderAction - Naming appender as [STDOUT]
22:42:57,016 |-INFO in ch.qos.logback.core.joran.action.NestedComplexPropertyIA - Assuming default type [ch.qos.logback.classic.encoder.PatternLayoutEncoder] for [encoder] property
22:42:57,050 |-INFO in ch.qos.logback.core.joran.action.AppenderAction - About to instantiate appender of type [ch.qos.logback.core.FileAppender]
22:42:57,053 |-INFO in ch.qos.logback.core.joran.action.AppenderAction - Naming appender as [FILE]
22:42:57,054 |-INFO in ch.qos.logback.core.joran.action.NestedComplexPropertyIA - Assuming default type [ch.qos.logback.classic.encoder.PatternLayoutEncoder] for [encoder] property
22:42:57,057 |-INFO in ch.qos.logback.core.FileAppender[FILE] - File property is set to [logs/log.log]
22:42:57,061 |-INFO in ch.qos.logback.classic.joran.action.RootLoggerAction - Setting level of ROOT logger to INFO
22:42:57,061 |-INFO in ch.qos.logback.core.joran.action.AppenderRefAction - Attaching appender named [STDOUT] to Logger[ROOT]
22:42:57,061 |-INFO in ch.qos.logback.core.joran.action.AppenderRefAction - Attaching appender named [FILE] to Logger[ROOT]
22:42:57,061 |-INFO in ch.qos.logback.classic.joran.action.ConfigurationAction - End of configuration.
22:42:57,062 |-INFO in ch.qos.logback.classic.joran.JoranConfigurator@5af0a4a - Registering current configuration as safe fallback point
If any issues arise while Logback is processing the configuration file, it will display notifications on the console.
Convention for Logger Names
Each Logger has a Logger a name which represents its logging context. The structure of logging contexts follows a similar pattern to the Java object hierarchy:
- A logger is an ancestor when its name, followed by a dot, prefixes a descendant logger‘s name,
- A logger is a parent when there are no ancestors between it and a child.
SCOP Framework follows the following customized conventions for logger names:
- Agent and all its subclasses uses the agentCanonicalClassName.agentName pattern (e.g.,
mage.cs.project.model.MyAgent.MyAgent-1), - Role and all its subclasses uses the loggers of their owner agent,
- All other classes uses their canonical class names (e.g.,
mage.cs.project.MyClass).
By default, each agent has a dynamic logger with an associated file appender which export the dedicated log files for each agent under the data\output\log folder using the agentName.log pattern.
The file appender uses the [%X{tick}][%logicalDate] " + agentName + " %msg%n encoding pattern for the logs.
Modifying Logger Levels
We can set the level for any logger. The possible levels are, in order of precedence: TRACE, DEBUG, INFO, WARN and ERROR.
...
    <logger name="mage.cs.project.model.MyAgent" level="WARN" />
    <logger name="mage.cs.project.MyClass" level="DEBUG" />
...
If a level is not explicitly assigned to a Logger, it inherits the level of its closest ancestor. The root logger defaults to INFO.
...
    <!-- Root Logger -->
	<root level="INFO">
		<appender-ref ref="STDOUT" />
	</root>
...
Disabling Loggers
We can disable any existing logger (especially the ones of agents) by setting its level to OFF.
...
    <logger name="mage.cs.project.model.MyAgent" level="OFF" />
...
Defining/Modifying Appenders
Loggers are responsible for sending LoggingEvents to Appenders, which do the actual logging. Generally, logging is associated with writing output to a file or the console, however Logback can be capable of a lot more. Logback offers various convenient appenders.
MAGE Variables in Logback
The SCOP Framework provides custom variables that can be used in Logback for enhanced logging purposes. These variables allow you to capture and log important context-specific information, such as the simulation time, which can be crucial for analyzing and debugging simulation runs.
Simulation Time (tick)
It’s often crucial to log the simulation time (tick) alongside other log information.
To configure Logback to include tick, modify your logback.xml configuration to include the simulation time in the log pattern. Use the %X{tick} placeholder to retrieve the value of the current tick.
<configuration>
    <!-- File Appender -->
    <property name="LOG_DIR" value="logs"/>
    <property name="LOG_FILE" value="log"/>
    <appender name="FILE" class="ch.qos.logback.core.FileAppender">
        <file>${LOG_DIR}/${LOG_FILE}.log</file>
        <append>false</append>
        <encoder>
            <pattern>%-4relative [%-5level] %logger{35} - %msg [Tick: %X{tick}]%n</pattern>
        </encoder>
    </appender>
</configuration>
With this configuration, your log entries might look like this:
 10 [INFO ] MyAgent - Starting simulation step [Tick: 135]
 20 [INFO ] MyAgent - Completed simulation step [Tick: 144]
This setup ensures that the tick is consistently included in each log entry, providing clear context for the timing of events within the simulation.
Custom Variables in Logback
To include a custom variable in your log entries using Logback, you need to do a few things:
1.	Make the custom veriable accessible to Logback: Ensure your custom variable is available to the logging framework. This can be done by setting the custom variable in the MDC (Mapped Diagnostic Context).
2.	Modify the logback.xml to include the custom variable: Update the pattern in the encoder to include the simulation time.
Here’s a step-by-step approach:
Step 1: Set the Custom Variable in MDC
In your simulation code, you can set the custom variable in MDC like this:
import org.slf4j.MDC;

public void logCustomVariable(long customVariable) {
    MDC.put("customVariable", String.valueOf(customVariable));
}
Call logCustomVariable(long customVariable) with the current value of the custom variable whenever its value is updated.
Step 2: Modify logback.xml to Include Custom Variable
Update your logback.xml to use the %X{customVariable} placeholder, which will be replaced by the value stored in the MDC under the key customVariable.
Here’s an example of your logback.xml:
<configuration>
    <!-- File Appender -->
    <property name="LOG_DIR" value="logs"/>
    <property name="LOG_FILE" value="log"/>
    <appender name="FILE" class="ch.qos.logback.core.FileAppender">
        <file>${LOG_DIR}/${LOG_FILE}.log</file>
        <append>false</append>
        <encoder>
            <pattern>%-4relative [%-5level] %logger{35} - %msg [Custom variable: %X{customVariable}]%n</pattern>
        </encoder>
    </appender>
</configuration>
Resources
For further information regarding how to use Logback, you can see the following resources:
7 - Frequently Asked Questions
Table of Contents
- What is the SCOP Framework?
- How do I get started with MAGE?
- How does testing work in MAGE?
- Why are assertions scheduled for later execution in tests?
- What roles are available in MAGE?
- How do I report a bug or request a feature?
What is the SCOP Framework?
MAGE is an advanced simulation or agent-based framework designed to model, test, and simulate complex scenarios, allowing users to craft dynamic agent-based models with ease.
How do I get started with MAGE?
- Installation: Download the latest version from our official website and follow the installation guidelines.
- Documentation: Familiarize yourself with the official documentation, tutorials, and examples provided.
- Community: Join our community forum or Discord channel to interact with other MAGE users, which is a great place to ask questions and share experiences.
How does testing work in MAGE?
Testing in MAGE integrates with JUnit 5, enabling users to specify, run, and validate tests for agents and simulations. Users can craft test cases, employ assertions, and schedule tests for execution, ensuring agents and simulations perform as intended.
Why are assertions scheduled for later execution in tests?
In the SCOP Framework, tests often run as part of simulations which unfold over a specific duration or set of events. Assertions are scheduled to be executed at precise moments during this simulation run. This design ensures that the simulation reaches the desired state or event before the assertions are checked.
What roles are available in MAGE?
MAGE has a variety of roles, including but not limited to:
- Experimenter: Oversees and manages experiments.
- Tester: Primarily used for testing purposes, running assertions and checks.
- Scheduler: Manages the timing and sequencing of events or actions.
- Interlocutor: Handles communication and interactions between agents.
How do I report a bug or request a feature?
If you encounter an issue or have suggestions for the SCOP Framework:
- Visit our official GitLab repository.
- Check if the issue or suggestion has already been reported.
- If not, create a new issue, detailing the bug or feature request, and follow the template provided.
- Our development team will review and respond to your submission promptly.
For more detailed information or specific queries, please refer to our official documentation or contact our support team.